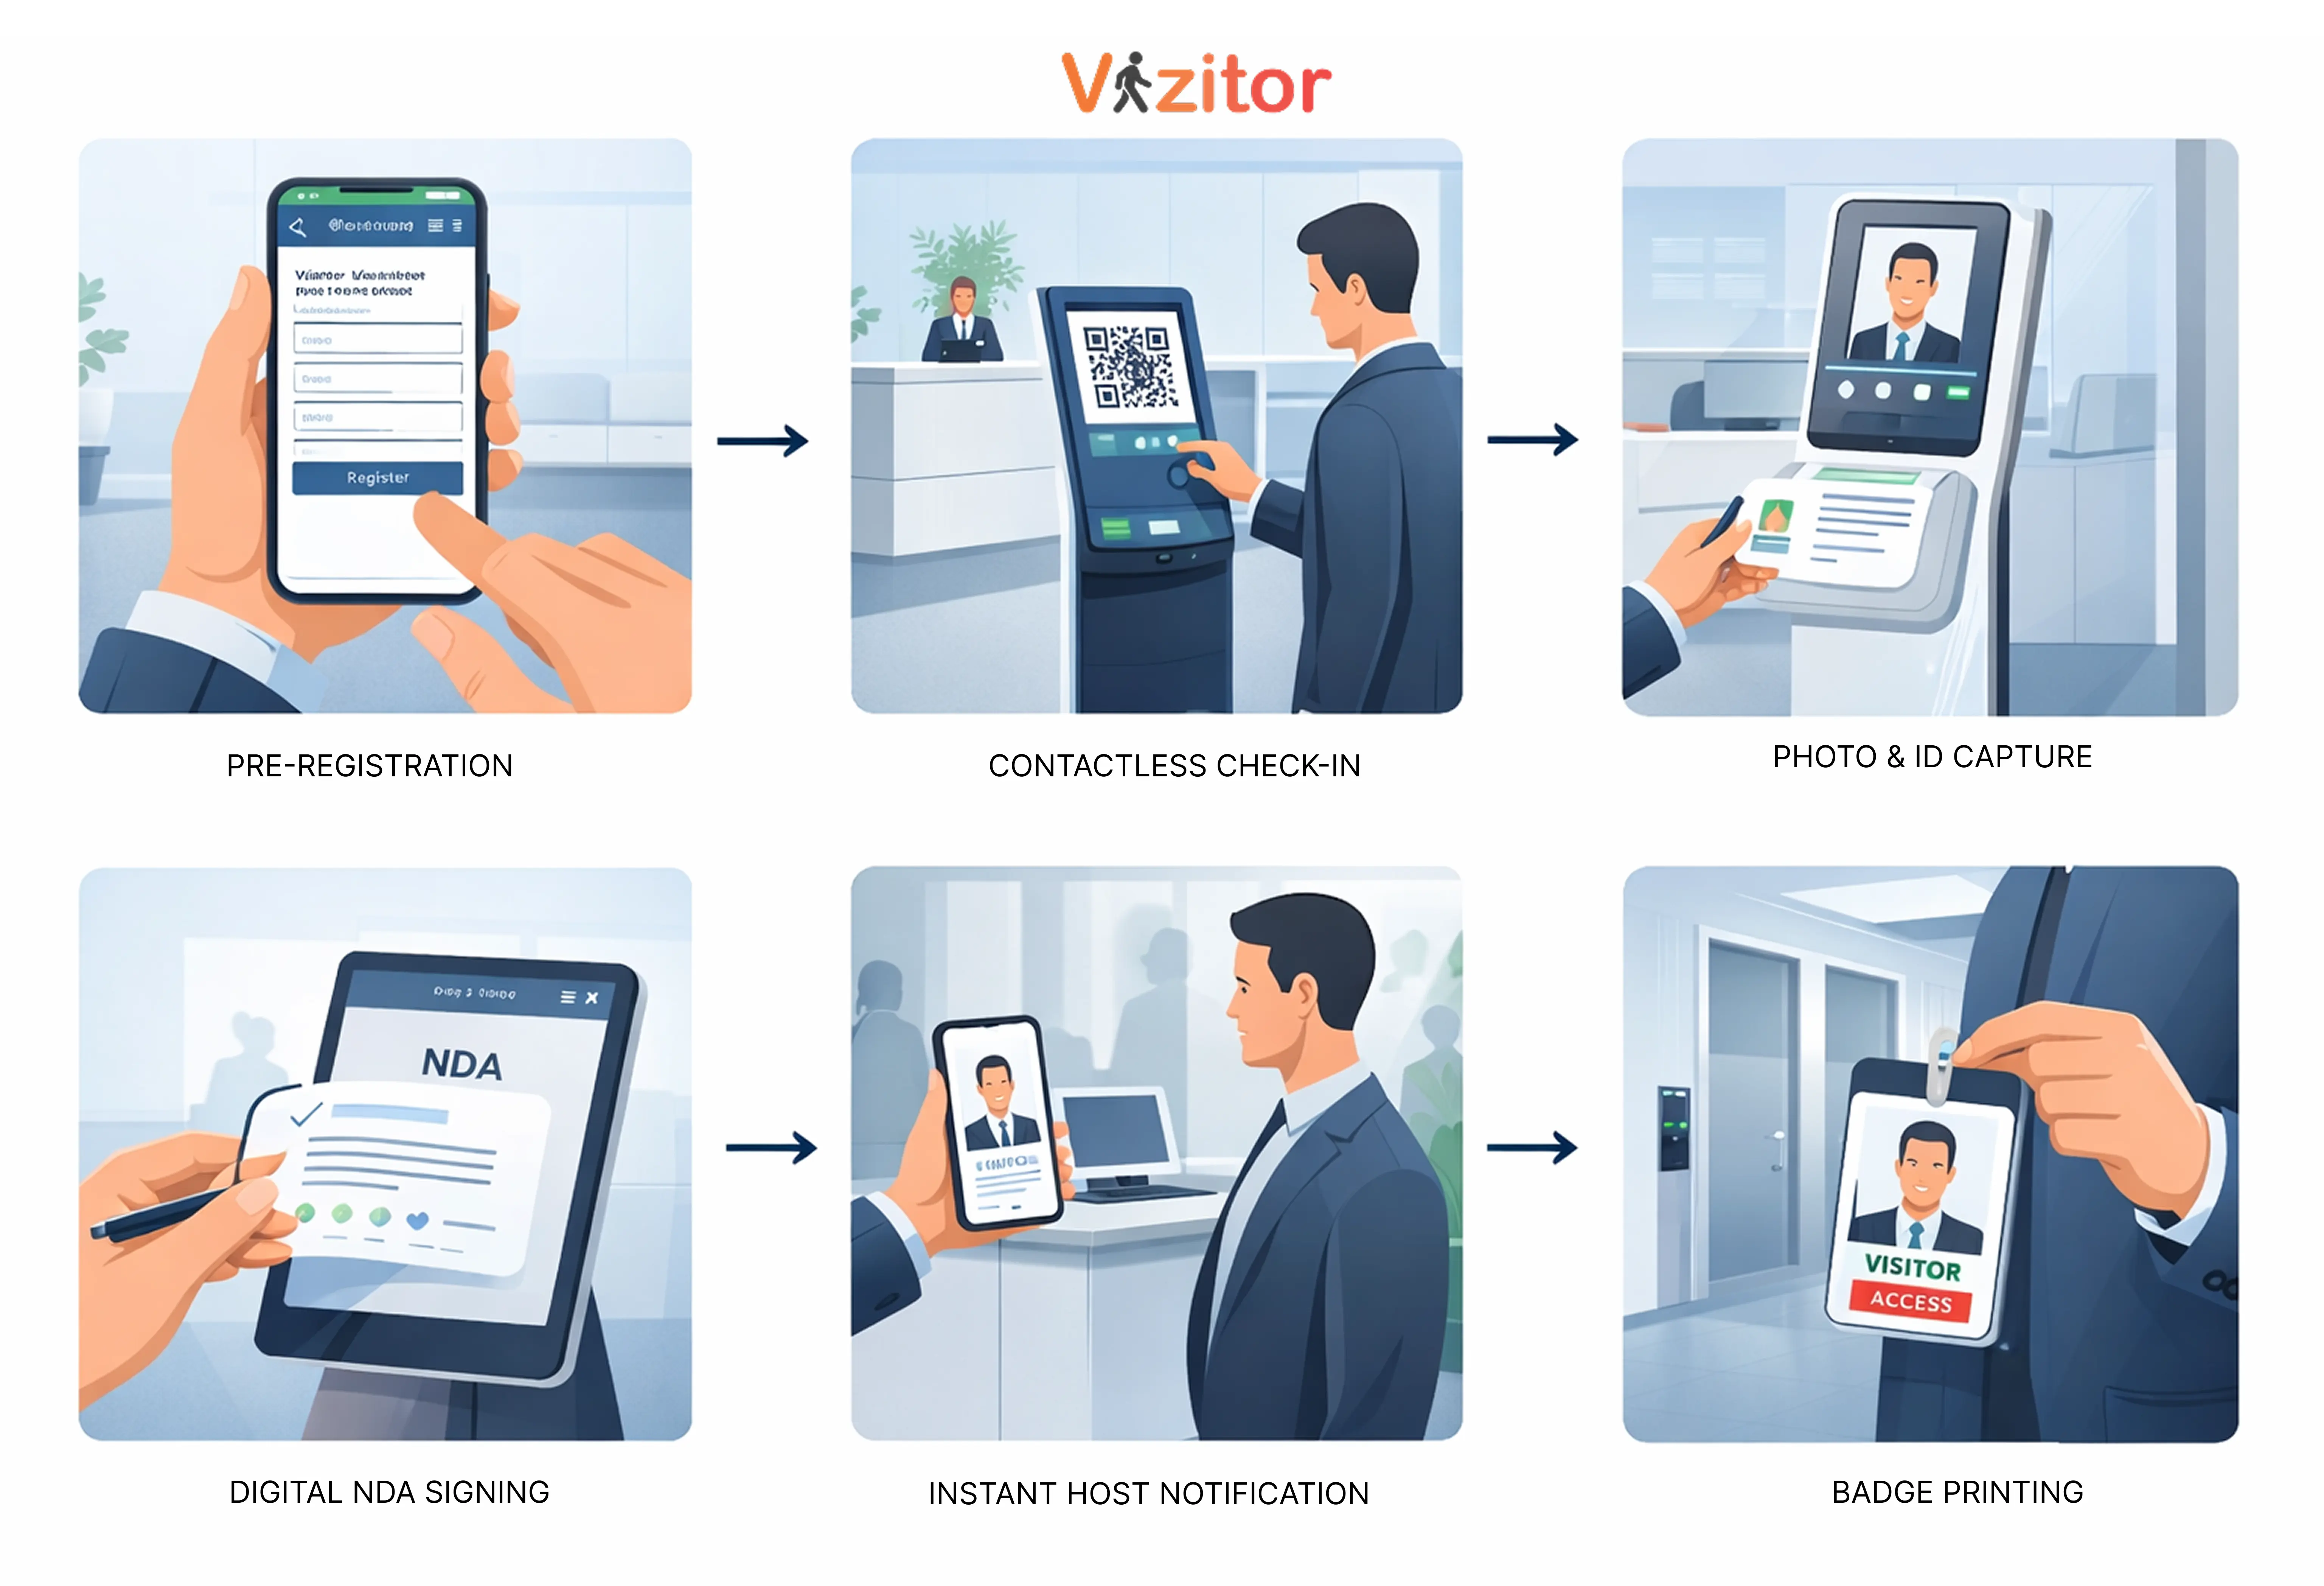
This guide walks you through switching from a paper visitor sign-in sheet to a fully digital office check-in system in five practical steps. It covers what to audit before you switch, how to choose the right system, how to configure it for your visitor types, how to train your team, and what to review after going live. Each step includes what to actually do, not just what to think about. The guide uses Vizitor as the example system throughout, showing how features like QR check-in, pre-registration, digital NDA signing, badge printing, and host notifications connect in a real office setup. The full migration takes most teams one afternoon.


Published on: Thu, Mar 5, 2026
Read in 8 minutes
Switching from a paper sign-in sheet to a digital visitor management system sounds like it should take weeks. A vendor evaluation, an IT project, training sessions, resistant colleagues, the works.
It doesn’t. Most offices complete the full migration in an afternoon. The part that takes time isn’t the setup, it’s deciding to do it.
If you’re still running reception on paper, here’s what that costs you: companies using manual check-in processes spend up to 40% more time on visitor handling than those using digital systems and that time adds up across every receptionist, every host, every visitor, every day.
This guide gives you a clear, step-by-step path from paper logbook to smart office. No fluff. Just what to do, in what order, and why.
Before you install anything, spend 20 minutes being honest about where your current process fails. This isn’t about criticising your team, it’s about knowing what you’re replacing and why, so you set up the new system to actually fix it.
Ask yourself these questions:
• Can you find out who is in your building right now, in under 60 seconds?
• Do you have a signed NDA or document on file for every contractor who visited last month?
• When a visitor arrives, how long before their host knows?
• If there were a fire alarm right now, would your roll call be accurate?
• Could anyone read the last 10 entries in your visitor logbook clearly?
If you answered no to two or more of those you already know what the gap costs. Write down the two or three failures that bother you most. These become your success criteria when you go live.
Common pain points we see most often: illegible handwriting, no host notification system, NDAs that go unsigned or get lost, and no way to run a headcount in an emergency. If any of these hit close to home, your migration is already justified.
The system you choose should fit what you actually have, not require you to buy what a vendor wants to sell you.
On hardware: most visitor management systems assume you have an iPad. Vizitor works on any Android tablet or iPad you already own. If there’s a spare tablet in your office drawer, that’s your kiosk. You don’t need to buy anything new to get started.
When evaluating options, the questions that matter most are:
• Does it work on your existing hardware (Android or iOS)?
• Does it have a free plan so you can test it properly before committing?
• Can visitors check in from their own phone without downloading an app?
• Does it work offline if your internet drops?
• Can you configure different flows for different visitor types (clients, contractors, delivery)?
Vizitor ticks all of these. It’s free to start, works on any Android or iOS tablet, supports QR code check-in from the visitor’s own phone, and stores data locally if the network goes down.
Try Vizitor, register your account, and set your location. That’s the entirety of Step 2. You’re already ahead of where most offices are.
This is the step most offices skip and then wonder why their digital system feels as disorganized as the paper one. Take 30 minutes to configure the system properly before anyone uses it.
Not every visitor is the same. A job candidate shouldn’t see the same check-in form as a contractor. A delivery driver doesn’t need to sign an NDA. Set up separate visitor types so each person only sees what’s relevant to them.
Start with three categories and expand later:
• General visitor / client
• Contractor / vendor
• Delivery / courier
Add the names and contact details of everyone in your office who might receive a visitor. In Vizitor, this is the list that appears when a visitor selects who they’re here to see. Make it complete, a visitor who can’t find their host’s name is stuck at your kiosk.
For any visitor type that should sign a document, upload it now and set it as required within that flow. The visitor won’t be able to complete check-in until they sign. This alone closes one of the most common compliance gaps in office management.
Decide how hosts get notified when their visitor arrives. Vizitor supports Slack, WhatsApp, SMS, and email. Pick the channel your team actually checks not the one that looks good on a feature list.
Practical tip: Set up a test visitor entry before you go live. Walk through the entire flow yourself from the visitor’s perspective on the tablet, and from the host’s perspective receiving the notification. Fix anything that feels clunky before your first real visitor experiences it.
The biggest reason digital systems fail isn’t the technology. It’s that the people who need to use them weren’t told why the change matters.
You don’t need a formal training session. You need a 10-minute conversation or a short written brief that covers three things:
• What changed: the paper logbook is gone. Visitors check in digitally. Here’s where the tablet is.
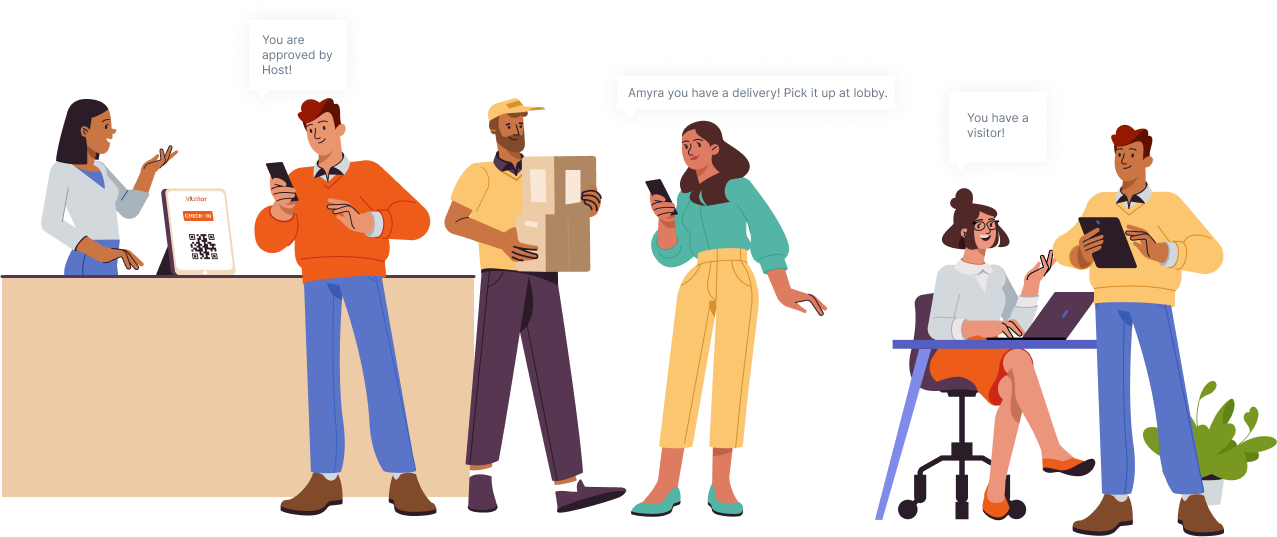
• What’s better for them: they get a WhatsApp or Slack message the moment their visitor arrives. No more waiting for the receptionist to track them down.
• What they need to do: nothing different. The system handles the rest.
The reception team needs slightly more, show them the admin dashboard, how to search for a visitor, and how to export the log if someone asks for it. That’s a 5-minute walkthrough, not a training program.
If you get pushback, the most effective answer is: ‘When the auditor asks who was in this building on a specific date, this is how you find the answer in 10 seconds.’ That usually ends the conversation.
Go live, let it run, and then check in after two weeks. This review should take 15 minutes and cover four things:
• Completion rate: are visitors completing the full check-in flow, or dropping off partway? If they’re dropping off, the form is too long or the NDA copy is too dense.
• Host notification timing: are hosts actually meeting their visitors promptly? If not, check whether the notification channel is right.
• Data accuracy: open the visitor log and look at the last 20 entries. Are they clean? Enable auto-checkout reminders if visitors are still showing as ‘in’ when they’ve left.
•Badge printing: if you have a badge printer, is it keeping up? Is the printer in the right place?
After this review, most offices make one or two small tweaks and then don’t touch the system for months. That’s the goal, a process that runs without requiring anyone to manage it.
The sign of a well-configured visitor management system is that nobody talks about it. Visitors check in, hosts get notified, logs are accurate. It disappears into the background and just works.
Here’s what your office looks like on the morning after you go live with Vizitor:
• Your receptionist no longer has to chase a host down the hall, the host gets a notification the moment their visitor taps ‘check in’
• Every visitor entry is timestamped, photographed, and in your cloud dashboard searchable by name, date, or company
• Contractors sign their NDA during check-in. It’s stored automatically. You will never have to hunt for a signed document again
• Visitors who pre-registered walk in and check in in under 30 seconds, their details are already in the system
• If the fire alarm goes off, you open the Vizitor app and see exactly who is still inside
None of this requires IT. None of this requires ongoing management. You set it up once, and it runs.
For most offices, the full migration; setup, configuration, and going live takes between two and four hours. If you have a straightforward setup with one location and one visitor type, it can be done in under an hour. The longest part is usually uploading NDA documents and configuring notification channels, not the technical setup itself.
No, Visitors check in on a tablet kiosk at reception, or scan a QR code and complete check-in on their own phone’s browser. No app download required on the visitor’s side. The Vizitor app is for your admin team.
You don’t need to digitize old paper records unless you have a specific compliance reason to do so. Your historical paper logs can be archived physically. All new visitor records from the day you go live will be in your Vizitor dashboard: searchable, exportable, and permanently stored.
In practice, this is rarely an issue, the check-in flow is simpler than most people expect. For visitors who genuinely struggle, your receptionist can complete the check-in on their behalf from the admin dashboard. The visitor’s entry is still logged accurately.