

Create an amazing impression with touchless check-ins every time a visitor comes into your premises. Greet your visitors with a customized touchless visitor flow based on your business.

Contact tracing help you know the status of your visitor's Accurate Time tracing and whom they met so it's easy to back trace in case of any virus exposure....
Read more

Pre-Registration helps your guests to check-In quickly with a QR code and entirely touchless process which help secure your workplace....
Read more

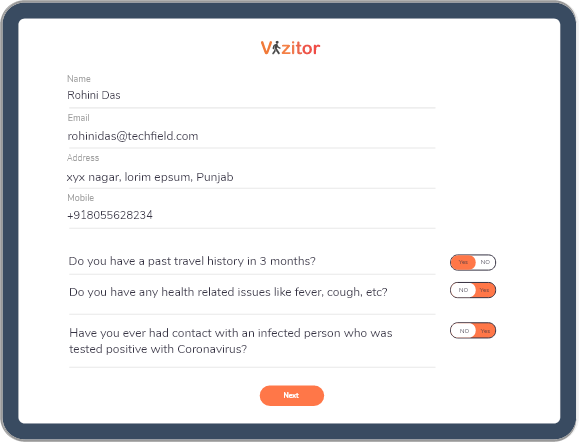
With Vizitor COVID Mode, youcan even screen your visitors with customized questionnaire and help you detects if they came from a contaminated....
Read more

Receive instant alerts when a guest arrives at your premises and even send visitor's details for verifying the access inside the workplace....
Read more
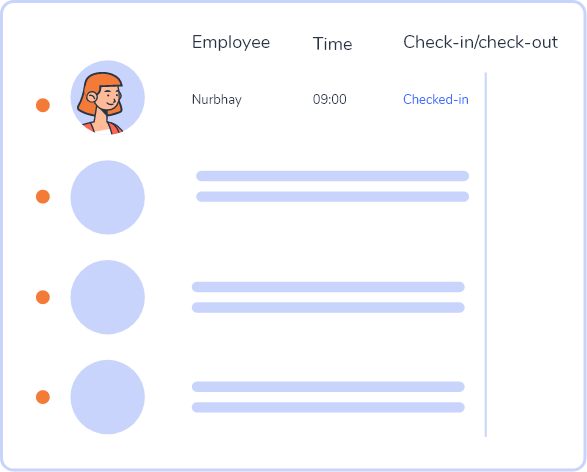
Your employees can sign-in to work without touching anything with the help of ZERO-Touch attendance system. Having a touchless system helps you curb the spread of viruses in your workplace.
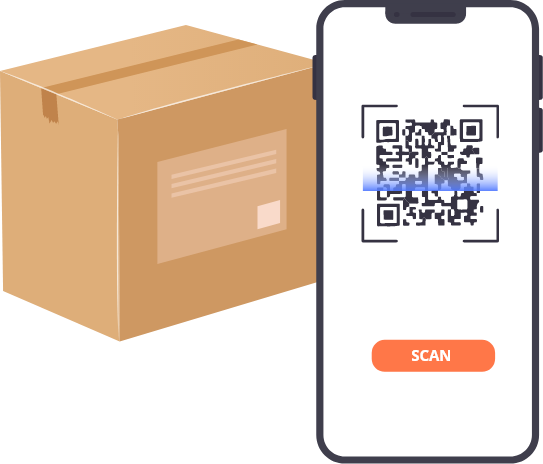
Make your deliveries safe and fast by having it delivered in a contactless manner. Employees can later on collect the delivery after few hours by just scanning a QR.
That will help you make your business operate securely

Multiple Covid-19 health Questionnaire with feature to find if user came from a contaminated zone....
Read more

Help maintain a occupancy limit inside the workplace to prevent overcrowding with live alerts....
Read more

Contact tracing help you know the status of your visitor's Accurate Time tracing and whom they met so it's easy to back trace in case of any virus......
Read more
Login on https://dashboard.vizitorapp.com/#/login with your registered email & password.
Step 2.Click on profile & fill billing details select online payment.
Step 3.Click on general in the profile section then click on renew plan.
Step 4.Select the plan, period & proceed the payment by online payment methods.
Step 5.Then once the payment is done you get the invoice on your registered email & your subscription is activated.
If you are getting difficulty to link your device through scanning. Please go for next alternate and follow these instructions.
Step 1.Login to your Vizitor dashboard
Step 2.Go to settings and navigate to devices.
Step 3.Click on the devices tab from the left menu.
Step 4.Click on click here then use the pairing code in the visitor app
Step 5.Now open your mobile app and Long press on top vizitor icon.
Step 6.Then, you have to enter generated code into the pairing code field.
We all know that keeping your employees and guests safe is the utmost top priority for a business. There are a few ways to get it done, starting with setting up Vizitor.
Step 1.Log in to your vizitor dashboard and select the Device tab from the left panel.
Step 2.Download and open the Vizitor application from Android / iOS device.
Step 3.Click on a pair device from your mobile device.
Step 4.Scan the QR code displayed on your web dashboard.
It’s very easy to sign up with Vizitor, especially if you have an Android Tablet or iPad available with you along with an Email address and a phone number to authorise your account.
Steps to get started with Vizitor
Step 1.To get started with Vizitor, simply sign up for a 10 days trial.
Step 2.Just complete the account setup by following the guided steps and confirm your account from your email.
Step 3.Download the Vizitor Mobile App For iOS or Playstore.
Step 4.Pair your mobile device with your account.
Step 5.Depending on which plan you choose, you’re all ready to start with signing your visitors and employees into your workplace.
Employees are very crucial for every business and providing them easy accessibility to premises is even more crucial. Vizitor allows you to add your employees manually and adding them in Vizitor is very easy.
Step 1.Login to your Vizitor dashboard.
Step 2.Click on the Employee tab from the top panel.
Step 3.Click on the Add Employee button and provide all the required details.
Step 4.Once you have filled in all the details. You’ll get a success notification of employee added successfully and you’ll find the details in your dashboard
A front desk or reception is the most crucial and important area for any business. As the saying goes ” First Impression Is The Last Impression”. The first impression of your reception can dramatically change the behaviour of any user, If your reception is hitech and has already adapted a visitor management solution, your guests will be amazed by how much the process is streamlined and Vizitor not only let them check-in with their own mobile devices but also let them check-in by using the web check-in feature.
Step 1.Login to your Vizitor dashboard.
Step 2.Click on the Vizitor Log tab from the left panel.
Step 3.Click on the web check-in tab and provide the mobile number of visitors.
Step 4.Once you confirm the mobile number, Input the additional details like Name, Mobile Number (It will be prefilled), Email, Purpose of check-in and Host they are here for.
Step 5.After clicking Next, the camera option will open ( Optional: This feature will only open if you have captured the visitor image as required).
Step 6.If you have enabled the badge option the badge will show up on the screen which can be printed.
Step 7.Once you skip or print the badge the dashboard will appear with the visitor checked-in to the system.
For businesses who receive 100s of guests daily, keeping a track of all the visitor logs can be very difficult if you are still using a paper base visitor log. However, if you are using a digital visitor management system keeping a track of your visitor can become very simple and you can even track the back dated visitor logs as we.
Step 1.Login to your Vizitor dashboard.
Step 2.Click on the Vizitor Log tab from the left panel.
Step 3.Once in the Visitor Log you can do the following things.
1. View details of a visitor by clicking on the eye icon.
2. You can print a badge for them by clicking on the printer icon.
3. You can remove the visitor from the visitor log by clicking on the bin icon.
4.You can checkout a user manually by clicking on the arrow.
Having a digital visitor management system present at your front desk / reception is a blessing and having a photo capturing feature provides an extra layer of security to your organisation.
Step 1.Login to your Vizitor dashboard.
Step 2.Click on the settings tab from the top.
Step 3.Click on the configuration from the left panel.
Step 4.Click on the app setting from top panel.
Step 5.You can enable or disable the capture visitor photo option by toggling the button to required.
A front desk/reception is one of the most important places for any business. As it gives out the first impression of your business to prospective clients and visitors. Having a digitally customised form will not only help you with streamlining the visitor data but will also help with shortening the waiting time.
Step 1.Login to your Visitor dashboard.
Step 2.Click on the settings tab from the top panel.
Step 3.Click on the sign-in form tab from the left panel.
Step 4.In order to add more fields simply click on the Add New Field option and select from text or drop down field.
You can customise the whole form according to your need and can add as many fields as you want. But, we suggest to use only those fields which are uttermost required as this will shorten the fill time for your guests.In this time of pandemic having a health care questionnaire is a must for your business. It not only helps you with keeping your employees and guests secure from the threat of virus but also gives your guests an extra comfort layer about your security measures.
Step 1.Login to your Visitor dashboard.
Step 2.Click on the settings tab from the top panel.
Step 3.Click on the configuration tab from the left menu.
Step 4.Click the Covid-19 Questionnaire tab from the top menu.
Step 5.Change the status of “Covid-19 Questionnaire?” to be required by clicking the button in front.
Once enabled, whenever someone checks-in via Vizitor they will be presented with some health related questions and if they select “Yes' ' to any of the questions they will be denied entry into premises.Adding a location to Vizitor is very simple. You can add as many locations you want to add but, that depends on the plan you have subscribed for. You can get a detailed understanding of how many locations are covered in each plan on our pricing page.
Step 1.To add a new location. Log in to your Vizitor Dashboard.
Step 2.Click on the setting from the top panel on your Dashboard.
Step 3.Click on Locations from the left menu on your Dashboard.
Step 4.Click on +create location button from the right-top on your dashboard.
Step 5.Enter Location Name and Address of your new location.
If you are a business that receives 100s of guests or visitors daily then keeping a track of them can be more easy by using a Visitor management system. You can put an extra layer of verification by printing the badges for people who check-in to your premises.
Step 1.Login to your Vizitor dashboard.
Step 2.Click on the settings tab from the top panel.
Step 3.Click on the configuration tab from the left menu.
Step 4.Click on the App setting tab from top.
Step 5.You can enable or disable the badge printing option by toggling the button to required.
Having a personalised front desk is one of the most important features for any business. Vizitor not only helps you in securing and streamlining your business but also helps you in giving a unique identity to your front desk as well.
Step 1.Log into your Vizitor Dashboard.
Step 2.Go to the settings tab from the top panel.
Step 3.Click on the branding tab from the left menu.
Step 4.Click on the upload Image button.
Step 5.Upload your business logo.
I will really appreciate it if you could refer vizitor to your friends, family and business partners.
Step 1.Login to your Vizitor dashboard.
Step 2.Click on Refer a Friend tab from the left panel.
Step 3.Once you are in the refer a friend section you can either invite your friend by typing their email address and clicking on the invite button or you share a personalised URL directly to them via a SMS or Email.
Step 4.You can also click on Analytics to see which of your invitees has successfully signed up and what is their subscription status. In addition to that you can also check the email address that has already signed up with Vizitor.
If we send a invite to a visitor Click on add invite button in invite in visitor Fill all the fields of pop up form and send invite to visitor.
Step 1.Login to your Vizitor dashboard.
Step 2.Click on the Invites tab from the left panel.
Step 3.Click on the send invite button. After clicking a pop up form will open asking to input the mobile number of visitors you want to invite.
Step 4.Once you fill out all the details just click on send and the invitation will be on its way to your visitor and the entry will start appearing in dashboard.
Step 5.You can also view details by creating a View button under the invites tab.
If you are getting difficulty to add organizatin by Vizitor pass app Click on add organization in setting inside profile, fill the location and send request After this, click on the Employee Association button in the employee of the dashboard and accept the request.
Login to your Vizitor dashboard
Step 2.Click on the Invites tab from the left panel.
Step 3.Once you click on the bulk invite an import wizard will open. Asking you to upload a csv file. You’ll need to make sure that the file matches the syntex.
Login to your Vizitor dashboard.
Step 2.Click on the Invites tab from the left panel.
Step 3.Once you are in the Invitees screen, click on Pre Appointment. The Pre Appointment URL will be copied.
Step 4.You can send the URL either via SMS or Email to the person you want to pre-invite. Once the person opens the URL a Book Appointment form will be opened.
Step 5.Once the invitee has successfully filled the form they will be shown a Booking Confirmation screen with their booking date and time.
Step 6.Once the booking is confirmed from the invitee end you will have the details available in your Vizitor dashboard. Along with an option to either approve or disapprove their booking.
With a smart visitor management system, you can have an attractive welcome screen, add your brand logo, customized badges, with top security. The ultimate one-stop solution. For efficient management of visitors, try Vizitor!